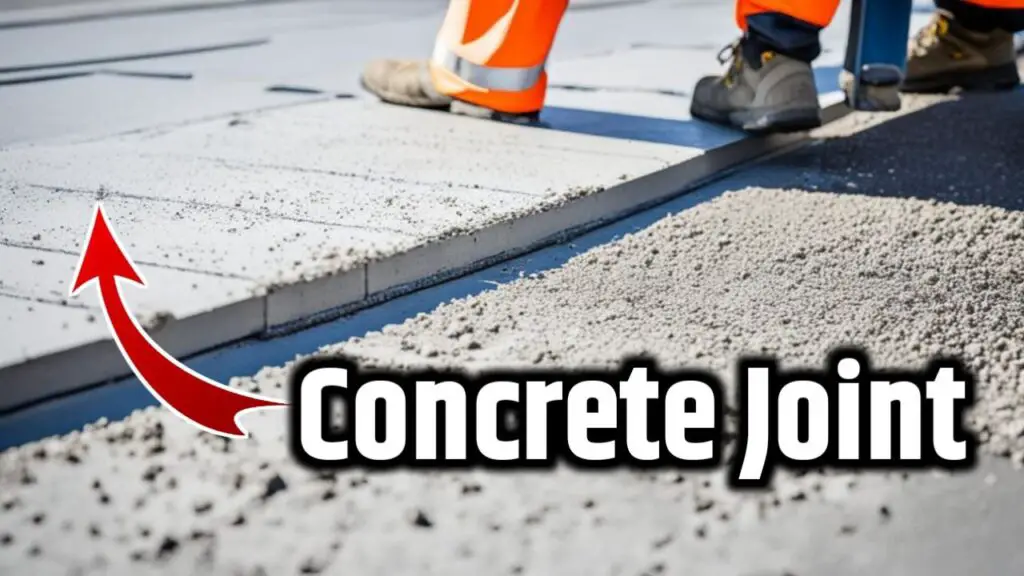
1

MDF vs HDF vs HDHMR | Which is Better? 10 Ultimate Comparison

MDF vs HDF vs HDHMR  

1). Introduction

MDF (Medium Density Fiberboard), HDF (High-Density Fiberboard), and HDHMR (High-Density High Moisture Resistance) are all engineered wood products with different characteristics and uses.

MDF is made by compressing wood fibers with adhesive under high pressure and temperature. It has a smooth surface and is dense and uniform in composition. MDF is commonly used for furniture, cabinets, shelving, and interior decorative applications. It is not suitable for areas with high moisture or humidity.

HDF is similar to MDF but has a higher density due to more tightly compressed fibers. It is stronger and more durable than MDF, making it suitable for applications that require more strength, such as flooring, doors, and furniture components.

HDHMR is a specialized variant of HDF that is designed to have enhanced moisture resistance. It is manufactured with moisture-resistant resins and is engineered to withstand higher humidity levels. HDHMR is often used in areas with increased moisture exposure, such as kitchens, bathrooms, and laundry rooms.

In terms of cost, MDF is generally the least expensive option, followed by HDF, and then HDHMR. However, prices can vary depending on factors such as thickness, quality, and geographical location.

MDF vs HDF vs HDHMR
MDF vs HDF vs HDHMR

When selecting between MDF, HDF, and HDHMR, consider the specific requirements of your project, including the level of durability and moisture resistance needed.

2). Composition

2.1 Composition of MDF

MDF is made by breaking down hardwood or softwood residuals into wood fibers and combining them with wax and a resin binder. These wood fibers are then subjected to high pressure and temperature, resulting in a dense and uniform panel. MDF panels are known for their smooth and consistent surface, making them ideal for painting and veneering. They are commonly used in furniture, cabinetry, molding, and interior trim applications.

MDF vs HDF vs HDHMR

2.2 Composition of HDF

DF is similar to MDF in its manufacturing process, but it is produced using higher pressure and a finer wood fiber blend. This results in a denser and stronger panel with improved screw-holding capacity and greater resistance to warping and moisture absorption. HDF panels are often used for applications that require greater strength, such as flooring, laminated furniture, and decorative wall panels.

MDF vs HDF vs HDHMR
MDF vs HDF vs HDHMR

2.3 Composition of HDHMR

HDHMR is a type of engineered wood product that combines the characteristics of HDF and moisture resistance. It is produced using a special resin binder that enhances its resistance to moisture and humidity. HDHMR panels are designed to withstand exposure to moisture, making them suitable for applications in areas with high humidity or occasional moisture exposure. They are commonly used in kitchen cabinets, bathroom furniture, and other areas where water resistance is essential.

In terms of composition, MDF, HDF, and HDHMR share the basic structure of wood fibers bonded together with a resin binder. However, their density, strength, and moisture resistance vary based on the specific manufacturing processes and materials used.

It’s important to note that while these engineered wood products offer many advantages, they also have limitations. They are not as strong as solid wood and may not hold screws as well. They can also be prone to swelling and damage when exposed to excessive moisture for extended periods.

In summary, MDF, HDF, and HDHMR are engineered wood products that provide cost-effective alternatives to solid wood. MDF is suitable for applications where a smooth and uniform surface is desired, HDF offers increased strength and durability, while HDHMR provides added moisture resistance. Understanding their composition and specific characteristics can help in selecting the most appropriate material for your intended application.

3). Fabrication

MDF, HDF, and HDHMR are all engineered wood products commonly used in various applications. While they have similarities, they differ in terms of composition, density, and usage. Here’s a brief overview of the fabrication processes and characteristics of each material

3.1 MDF Fabrication

MDF is manufactured by breaking down hardwood or softwood fibers into individual wood particles, combining them with a synthetic resin binder, and forming them into panels under heat and pressure. The fibers are generally smaller in size, resulting in a denser and smoother panel compared to other types of fiberboards. MDF is known for its excellent machining properties, as it can be easily cut, drilled, and shaped. It is widely used in furniture manufacturing, cabinetry, interior molding, and other applications where a smooth and uniform surface is desired. MDF panels are available in various thicknesses and can be painted, laminated, or veneered to achieve different aesthetics.

MDF vs HDF vs HDHMR

3.2 HDF Fabrication

HDF is similar to MDF but has a higher density due to its finer wood particles and a greater amount of bonding resin. The manufacturing process for HDF is similar to MDF but with increased pressure and resin content. This results in a stronger and more durable panel that is less prone to warping and moisture absorption. HDF is commonly used for applications that require more strength, such as door skins, subflooring, laminated flooring, and high-traffic areas where impact resistance is crucial.

3.3 HDHMR Fabrication

HDHMR board is a variation of HDF that incorporates water-resistant properties. It is produced using the same manufacturing process as HDF but with the addition of moisture-resistant resins and additives. This makes HDHMR more suitable for applications exposed to moisture or high humidity levels, such as bathroom vanities, kitchen cabinets, and outdoor furniture. HDHMR panels are engineered to have better dimensional stability and resistance to swelling and warping when exposed to moisture.

In summary, MDF, HDF, and HDHMR are all engineered wood products with different densities and characteristics. MDF is known for its smooth surface and versatility in various interior applications. HDF provides higher strength and is commonly used for flooring and doors. HDHMR offers moisture resistance in addition to HDF’s strength, making it suitable for humid or wet environments. The choice of material depends on the specific requirements of the project, such as the desired strength, surface finish, and resistance to moisture. It is recommended to consult with professionals or suppliers to determine the most appropriate option for your particular application.

4). Installation

MDF (Medium Density Fiberboard), HDF (High-Density Fiberboard), and HDHMR (High-Density High Moisture Resistance) are all engineered wood products commonly used in construction, cabinetry, and furniture manufacturing. Here’s a comparison of their installation characteristics:

4.1 Installation of MDF

MDF is a versatile and widely used material due to its smooth surface and consistent density. It is relatively easy to work with and can be cut, drilled, and shaped easily. MDF is commonly used for interior applications such as furniture, cabinets, trim, and decorative paneling. It is important to note that MDF is not suitable for wet environments as it can swell and lose its structural integrity when exposed to moisture. During installation, MDF panels can be attached using screws, nails, or adhesive, and joints can be reinforced with wood glue or dowels.

MDF vs HDF vs HDHMR

4.2 Installation of HDF 

HDF is similar to MDF but has a higher density, making it stronger and more durable. It is commonly used for applications that require added strength, such as flooring, doors, and wall panels. HDF provides a stable and smooth surface, making it suitable for laminate or veneer finishes. Installation of HDF typically involves cutting the panels to size, fastening those using screws, nails, or adhesive, and ensuring proper subfloor preparation for flooring applications. HDF is not recommended for areas exposed to high moisture levels.

MDF vs HDF vs HDHMR

4.3 Installation of HDHMR

HDHMR is a specialized type of engineered wood that combines high density with enhanced moisture resistance. It is designed to withstand exposure to humidity, making it suitable for wet areas like kitchens and bathrooms. HDHMR is often used for cabinetry, countertops, and other moisture-prone applications. During installation, HDHMR is typically cut and assembled in a similar manner to MDF or HDF, using appropriate fasteners and adhesives. Proper sealing of edges and joints is crucial to maintain the moisture resistance properties.

MDF vs HDF vs HDHMR

In terms of installation, all three materials can be worked with using standard woodworking tools. They can be cut, shaped, and fastened using similar methods. However, it’s important to consider their specific characteristics and limitations for different applications. For example, MDF is ideal for indoor projects but not suitable for wet environments, while HDF offers increased strength and HDHMR provides moisture resistance.

It is recommended to follow the manufacturer’s guidelines and best practices for the specific product being installed. This includes proper handling, cutting techniques, and using compatible adhesives and fasteners. Additionally, ensuring proper ventilation during installation is important as these materials can release fine dust particles that may be harmful when inhaled.

Consulting with professionals or referring to installation guides specific to the chosen product is advisable to ensure a successful installation and to maximize the performance and durability of the chosen engineered wood material.

5). Strength and durability

MDF, HDF, and HDHMR are all engineered wood products that differ in their composition and intended use. Here’s an overview of their strength and durability characteristics:

5.1 Strength and Durability of MDF

MDF is made by compressing wood fibers with resin under high pressure and temperature. It has a uniform density and a smooth surface. In terms of strength, MDF is relatively strong and can hold screws and nails reasonably well, although it may not have the same holding power as solid wood. However, MDF is not as strong as HDF or HDHMR due to its lower density. MDF is more susceptible to moisture and may swell or warp if exposed to water. It is also prone to damage from impact or heavy loads. However, when properly sealed and maintained, MDF can have good durability and stability.

5.2 Strength and Durability of HDF

HDF is similar to MDF, but it has a higher density due to the use of finer wood fibers and increased pressure during the manufacturing process. The higher density of HDF provides improved strength and durability compared to MDF. HDF is stronger and more rigid, making it a preferred choice for applications that require more structural stability, such as furniture, cabinetry, and flooring. HDF offers better screw-holding ability and resistance to impact compared to MDF. It is less prone to swelling and warping due to its denser composition. However, like MDF, HDF is not moisture-resistant and can be damaged by prolonged exposure to water.

5.3 Strength and Durability of HDHMR

HDHMR is specifically engineered to have enhanced moisture resistance properties. It is made by using moisture-resistant additives during the manufacturing process. HDHMR offers superior durability and moisture resistance compared to both MDF and HDF. It is designed for applications that require resistance to humidity and water, such as kitchen cabinets, bathroom furniture, and outdoor use. HDHMR is less prone to swelling, warping, and delamination when exposed to moisture. It also has better screw-holding capacity and impact resistance compared to MDF and HDF.

Overall, when it comes to strength and durability, HDHMR provides the highest level of performance due to its moisture resistance properties. HDF follows next with its denser composition and improved strength compared to MDF. MDF, while less strong than HDF and HDHMR, can still be a suitable option for less demanding applications, provided it is properly sealed and protected from moisture. It’s important to consider the specific requirements of your project and choose the engineered wood product that best aligns with those needs in terms of strength, durability, and resistance to moisture.

6). Maintenance

Maintenance of MDF vs HDF vs HDHMR can vary due to their different compositions and properties. Here’s a breakdown of their maintenance requirements:

6.1 Maintenance of MDF

MDF is a composite wood product made from wood fibers and resin binders. It is known for its smooth and uniform surface. When it comes to maintenance:

Cleaning – MDF can be easily cleaned with a damp cloth or sponge. Avoid using excessive water or harsh cleaning agents as they can cause swelling or damage to the material.

Protection – MDF is susceptible to moisture and should be protected from direct contact with water. It is recommended to use coasters, mats, or protective pads to prevent water damage or staining.

Avoiding Scratches – MDF is not as durable as solid wood and is prone to scratches and dents. To prevent this, use felt pads or furniture glides under objects to avoid direct contact with the surface.

Repairs – If MDF gets chipped or damaged, it can be repaired by filling the affected area with wood filler, sanding it down, and refinishing or repainting the surface.

6.2 Maintenance of HDF

HDF is similar to MDF but has a higher density and is more durable. It is commonly used for applications that require greater strength and stability. Maintenance for HDF is generally similar to MDF, with a few additional considerations.

Moisture Resistance – HDF is more moisture-resistant than MDF, but it is still advisable to avoid prolonged exposure to water or high humidity. Wipe up spills promptly and ensure proper ventilation in areas where HDF is installed.

Sealing – HDF can be sealed with paint, varnish, or laminate to provide an added layer of protection against moisture and wear. This can help enhance its durability and longevity.

Preventing Swelling – While HDF is less prone to swelling compared to MDF, it is still important to avoid excessive moisture. Applying a coat of sealant to the edges and back of HDF panels can help minimize moisture absorption and prevent swelling.

MDF vs HDF vs HDHMR

6.3 Maintenance of HDHMR

HDHMR is specifically engineered to withstand high levels of moisture and is often used in wet areas such as kitchens and bathrooms. Maintenance for HDHMR includes.

Cleaning – HDHMR can be cleaned with a damp cloth or mild detergent. It is important to remove any spills or moisture promptly to prevent damage.

Moisture Protection – HDHMR is designed to resist moisture, but it is still advisable to avoid prolonged exposure to standing water. Regularly check for any signs of water damage or leaks and address them promptly.

Sealing – HDHMR typically comes with a factory-applied laminate or coating that provides additional moisture resistance. Ensure that the edges and cut edges are properly sealed to prevent moisture penetration.

Avoiding Abrasive Cleaners – Harsh or abrasive cleaners can damage the surface of HDHMR. Stick to mild cleaning agents and soft cloths to preserve its appearance and durability.

In summary, MDF vs HDF vs HDHMR have different maintenance requirements due to their varying compositions and moisture resistance. Regular cleaning, protecting against moisture, and avoiding excessive force or abrasion are key to maintaining the appearance and longevity of these materials.

7). Cost

The cost of MDF (Medium Density Fiberboard), HDF (High-Density Fiberboard), and HDHMR (High-Density High Moisture Resistance) can vary based on factors such as thickness, quality, and location. Here’s a general idea of their relative costs:

MDF is generally the most affordable option among the three. The cost of MDF can range from $1 to $5 per square foot, depending on the thickness and quality of the board.

HDF is denser and stronger than MDF, which often makes it a slightly more expensive option. The cost of HDF can range from $2 to $8 per square foot, depending on the thickness and quality of the board.

HDHMR is a high-density board with enhanced moisture resistance properties, making it suitable for humid environments or areas prone to moisture. The cost of HDHMR can range from $3 to $10 per square foot, depending on the thickness and quality of the board.

These price ranges are approximate and can vary based on factors such as geographical location, supplier, and specific product specifications. It’s always a good idea to get quotes from multiple suppliers or consult with professionals in your area to get an accurate cost estimate for your specific project.

8). Comparison

  • MDF & HDF & HDHMR are all engineered wood products that have gained popularity in various applications. Here is a comparison of MDF vs HDF vs HDHMR in terms of their composition, characteristics, and common uses.
  • MDF is made from wood fibers that are bonded together using a resin or adhesive under high pressure and temperature. The resulting board has a uniform density and a smooth, consistent surface.
  • HDF is similar to MDF in terms of composition but has a higher density. It is produced using the same process of compressing wood fibers with resin or adhesive.
  • HDHMR is an upgraded version of MDF and HDF that offers improved moisture resistance properties

8.1 Density

  • MDF has a medium density, typically ranging from 600 kg/m3 to 800 kg/m3. This density makes it relatively heavy and stable.
  • HDF has a higher density compared to MDF, typically ranging from 800 kg/m3 to 1,000 kg/m3. This higher density results in a more rigid and robust board.
  • HDHMR typically has a high density similar to HDF, providing good strength and stability.

8.2 Specification

  • MDF has good dimensional stability and is resistant to warping or cracking.

  • HDF is stronger and more durable than MDF. It has excellent resistance to impacts, making it suitable for applications that require higher strength.

  • HDHMR is manufactured using special resins and additives to enhance its ability to withstand moisture.

8.3 Surface Finish

  • MDF has a smooth surface that is ideal for painting, veneering, or laminating. It provides a consistent base for finishes and does not have grain patterns or knots like natural wood.

  • HDF has a smooth and uniform surface similar to MDF. It is often used as a substrate for laminate or veneer finishes due to its stability and strength.
  • MDF vs HDF vs HDHMR
  • Like MDF & HDF & HDHMR has a smooth and uniform surface that is suitable for various finishes such as paint, laminate, or veneer.

8.4 Machinability 

  • MDF is easy to machine and shape. It can be cut, drilled, routed, or carved to create intricate designs or custom shapes.

  • HDF is more difficult to machine compared to MDF due to its higher density. However, it can still be cut and shaped using appropriate tools and techniques.

  • HDHMR can be machined similarly to MDF and HDF, although it may require appropriate tools and techniques due to its higher density.

8.5 Uses

  • MDF is commonly used in furniture manufacturing, cabinetry, shelving, interior trim, and decorative panels. It is also used in applications where a smooth, uniform surface is desired, such as in door manufacturing.

  • HDF is commonly used for applications that require enhanced strength and durability. It is often used in flooring, wall panels, furniture components, doors, and other high-traffic areas where impact resistance is important.

  • HDHMR is commonly used in applications where moisture resistance is essential. It is often used in kitchen cabinets, bathroom vanities, countertops, outdoor furniture, and other areas prone to

9). Advantages

MDF, HDF, and HDHMR  are all engineered wood products used in various applications. Each type has its own advantages and characteristics that make them suitable for different purposes. Here are the advantages of MDF vs HDF vs HDHMR:

9.1 Advantages of MDF

Smooth Surface – MDF has a smooth and uniform surface, making it ideal for applications where a consistent and even finish is desired. It is often used in furniture manufacturing, cabinetry, and decorative millwork.

Versatility – MDF is highly versatile and can be easily machined, cut, and shaped into various forms and designs. It holds screws and nails well and allows for intricate detailing and carving.

MDF vs HDF vs HDHMR

Stability – MDF has low dimensional changes, which means it is less prone to expanding or contracting due to changes in humidity and temperature. This stability makes it a reliable choice for applications where consistency is crucial.

Cost-Effective – MDF is generally more affordable than solid wood or plywood, making it a cost-effective option for projects where budget is a concern.

Finishing Options – MDF accepts paints, veneers, and laminates exceptionally well, providing a smooth and flawless finish. It is commonly used as a substrate for laminated surfaces or as a base for veneers to achieve a desired aesthetic.

Environmental Benefits – MDF is made from recycled wood fibers and does not require the harvesting of large trees. This makes it a more environmentally friendly choice compared to solid wood.

9.2 Advantages of HDF

Increased Density – HDF is denser and stronger than MDF, making it suitable for applications that require greater durability and strength. It is commonly used for high-traffic areas and heavy-duty furniture.

Enhanced Screw Holding – HDF has excellent screw-holding capabilities, allowing it to securely hold screws and fasteners. This makes it a preferred choice for applications that require strong connections, such as furniture assembly.

Machinability – HDF is highly machinable and can be easily routed, shaped, and milled. Its density provides better resistance to chipping or splintering, resulting in cleaner and more precise cuts.

Resistance to Moisture – While HDF is not inherently moisture-resistant, it has better resistance to moisture compared to MDF. It is less prone to swelling or warping when exposed to humid environments, making it suitable for applications where moisture resistance is important.

9.3 Advantages of HDHMR

Superior Moisture Resistance – HDHMR is specifically designed to have high moisture resistance, making it suitable for applications in humid or wet environments. It is commonly used in areas like kitchens, bathrooms, and utility spaces.

Enhanced Durability – HDHMR has a higher density and improved strength compared to MDF and HDF, providing better resistance to impacts, scratches, and wear. This durability makes it suitable for high-traffic areas and applications where toughness is required.

Easy Maintenance – HDHMR is easy to clean and maintain due to its moisture-resistant properties. It is less prone to water damage or staining, making it a practical choice for areas that require frequent cleaning or are exposed to moisture.

MDF vs HDF vs HDHMR

10). Conclusion

In summary, MDF vs HDF vs HDHMR are engineered wood products that provide cost-effective alternatives to solid wood. MDF is suitable for applications where a smooth and uniform surface is desired, HDF offers increased strength and durability, while HDHMR provides added moisture resistance. Understanding their composition and specific characteristics can help in selecting the most appropriate material for your intended application.

In terms of composition, MDF vs HDF vs HDHMR share the basic structure of wood fibers bonded together with a resin binder. However, their density, strength, and moisture resistance vary based on the specific manufacturing processes and materials used.

MDF vs HDF vs HDHMR

It’s important to note that the specific advantages of each type of engineered wood will depend on the manufacturer, grade, and other factors. Additionally, while these materials offer several benefits, it’s crucial to consider the specific requirements of your project and consult with professionals or manufacturers to ensure the right material is chosen for your specific application.

So friends this was the basic comparison between MDF vs HDF vs HDHMR. I hope this article will definitely help you. If you like this information please share it with your friends & If I have missed any information or you have any suggestions then you can mention them in the comments section for more such blog posts just click subscribe to myengineeringsupport.com so that you won’t miss any new post.

If you want a PDF copy of this, 

MDF vs HDF vs HDHMR

So let’s know by commenting & you can message us on our Instagram & telegram channel, or you can download it from the top right-hand corner of this post.

Bar Bending Schedule (BBS) Basics Part -1

MDF vs HDF vs HDHMR

This Ebook is specially designed for Freshers Civil Engineers. Recommended for Quantity Surveyors & Billing Engineers. Here You Can Learn All Basic Concepts & Formulas for Bar Bending schedules (BBS).

Thanks For the Great Attention!

Good Bye & Take Care

Happy Learning 

Also, Read,

Veneer and laminate 

Veneer V/s MDF

Wall Mounted vs Floor Mounted Toilets

Flush Door vs Wooden Panel Door

concealed wiring and open wiring

UPVC vs Aluminium vs Wooden Windows

Related Video,


10 Ultimate Comparision between AAC Block and Red Clay Bricks | Which is Better?

Difference between AAC Block and Red Clay Bricks

Introduction

(Autoclaved Aerated Concrete) AAC block and red clay bricks are two different types of building materials with distinct characteristics.

AAC blocks are made from a mixture of cement, lime, sand, water, and a small amount of aluminum powder. The mixture is poured into molds and then cured with high-pressure steam. The result is a lightweight, cellular concrete block with a porous structure. AAC blocks have good insulation properties, high strength, and are resistant to fire, pests, and mold.

On the other hand, red clay bricks are made by firing clay in a kiln. They are dense, solid blocks with a uniform shape and size. Red clay bricks have good compressive strength and are durable, but they are not as good at insulating as AAC blocks. They are also more susceptible to damage from moisture, pests, and fire.

AAC Block and Red Clay Bricks

In summary, AAC blocks are lightweight, porous, and have good insulation properties, while red clay bricks are dense, solid, and have good compressive strength. The choice between these two materials depends on the specific requirements of the building project, such as the climate, location, and type of construction.

AAC Block and Red Clay Bricks

What Are The Major Differences Between AAC Block And Red Clay Bricks

Sl.

Parameters

AAC Block

Red Clay Brick

1

 Material Composition

a mixture of cement, lime, sand, water, and aluminum powder

natural clay

2

Density

 550-650 kg/m³

 1600-1800 kg/m³

3

Compressive Strength

3.5 to 7.5 N/mm²

3.5 to 5 N/mm²

4

Thermal insulation

Better than Red Clay Bricks

Less than AAC Block

5

Cost

Expensive  But reduce the overall  cost of construction

Chipper

6

Weight

Light Weight

Heavier than AAC Block

7

Sound insulation

Better

Not Better            

8

Drying shrinkage

 Less  ( 0.4% ) 

More  ( 0.8% )

Material Composition of AAC Block And Red Clay Bricks

1). Composition of AAC Block

AAC blocks are a type of lightweight, precast, foam concrete building material. They are primarily composed of the following materials –

Fly Ash: Fly ash is a fine, powdery substance that is produced as a byproduct of burning pulverized coal in power plants. It is used as a substitute for Portland cement in the production of AAC blocks.

Cement: Cement acts as a binder and provides strength to the AAC blocks. It is usually Portland cement, which is a commonly used type of cement.

Lime: Lime is used to enhance the workability and plasticity of the AAC block mixture. It also contributes to the overall strength of the blocks.

Sand: Sand is an essential component of AAC blocks. It provides the required texture, reduces the density of the blocks, and improves thermal insulation.

Related Video:- AAC Block and Red Clay Bricks

Water: Water is necessary for the hydration process of cement, which helps in the formation of the AAC blocks.

Aluminum Powder: Aluminum powder reacts with lime and water to produce hydrogen gas, which creates air bubbles in the mixture. These air bubbles contribute to the lightweight and insulating properties of AAC blocks.

Composition of Red Clay Bricks

Red clay bricks are traditional building materials made from clay that is fired in a kiln. The composition of red clay bricks typically includes the following materials:

Clay: Clay is the primary raw material used in the production of red clay bricks. It is a natural, fine-grained soil that contains a high proportion of aluminum silicates. Clay provides plasticity and workability to the brick mixture.

Sand: Sand is added to the clay mixture to improve its workability and reduce shrinkage during the firing process. It also helps in controlling the texture and strength of the bricks.

Water: Water is used to moisten the clay and sand mixture, making it malleable and suitable for molding into bricks.

AAC Block and Red Clay Bricks

Firing Additives: Various additives, such as sawdust or rice husks, may be included in the mixture to enhance the firing process. These additives burn away during firing, creating small voids that increase the insulation properties of the bricks.

Coloring Agents: Sometimes, iron oxide or other coloring agents are added to the mixture to give the bricks their characteristic red color.

After the raw materials are mixed, the brick mixture is molded into the desired shape and then fired in a kiln at high temperatures, typically between 900 to 1,200 degrees Celsius (1,650 to 2,200 degrees Fahrenheit), to harden and strengthen the bricks.

Related Video:- AAC Block and Red Clay Bricks

2). Density

The density of materials can vary depending on the specific type and manufacturing process. However, I can provide you with approximate density ranges for AAC block and red clay bricks based on commonly used standards.

The density of AAC Block

The density of AAC blocks typically ranges from 500 to 900 kg/m³. However, the most commonly used density for AAC blocks is around 600 to 800 kg/m³.

The density of Red Clay Bricks

Red clay bricks generally have a higher density compared to AAC blocks. The density of red clay bricks typically ranges from 1,800 to 2,200 kg/m³.

It’s important to note that these values are approximate ranges and may vary depending on the specific manufacturer and geographical location. If you require precise density values, it is recommended to consult the specifications provided by the manufacturer of the particular AAC Block and Red Clay Bricks you are interested in.

3). Thermal insulation

Thermal insulation refers to the ability of a material to reduce the transfer of heat between two surfaces or areas with different temperatures. Both AAC block and red clay bricks have different thermal insulation properties. These are discussed here –

Thermal insulation of AAC Blocks

AAC blocks are lightweight, precast building materials made from natural raw materials such as sand, cement, lime, gypsum, water, and a small amount of aluminum powder. During the manufacturing process, the blocks are subjected to autoclaving, which creates air pockets in the material, giving them a cellular structure.

AAC Block and Red Clay Bricks

AAC blocks have excellent thermal insulation properties due to the presence of these air pockets within the material. The air pockets act as insulators, reducing the transfer of heat. The thermal conductivity of AAC blocks is generally lower than that of traditional clay bricks, which means they provide better insulation.

The specific thermal insulation properties of AAC blocks can vary depending on the density of the blocks. Lower-density blocks tend to offer better insulation. AAC blocks typically have thermal conductivity values ranging from 0.1 to 0.2 W/m·K, which indicates their ability to resist heat transfer.

AAC Block and Red Clay Bricks

Thermal insulation of Red Clay Bricks

Red clay bricks are traditional building materials made from clay, which is molded and then fired in a kiln. The firing process gives the bricks their characteristic red color and makes them durable and sturdy.

Compared to AAC blocks, red clay bricks have lower thermal insulation properties. Clay bricks are denser and have fewer air pockets within the material, which allows for greater heat transfer. Consequently, they have higher thermal conductivity values, usually ranging from 0.6 to 1.0 W/m·K.

While red clay bricks may not provide the same level of thermal insulation as AAC blocks, they have other advantages, such as high compressive strength and durability. These properties make them suitable for load-bearing applications in construction.

In summary, when it comes to thermal insulation, AAC blocks generally outperform red clay bricks due to their lower thermal conductivity. However, the choice between the two materials should consider other factors like structural requirements, cost, availability, and local building codes and regulations. Consulting with a structural engineer or architect can help determine the best choice for your specific project.

4). Cost

AAC blocks are typically more expensive than Red clay bricks, but their lightweight and easy-to-use properties can offset some of this cost by reducing construction time and labor costs.

The cost of AAC blocks and red clay bricks can vary depending on various factors such as location, supplier, quantity purchased, and current market conditions.

5). Size

AAC blocks are available in different sizes, which include:

  • 600mm x 200mm x 50 mm
  • 600mm x 200mm x 75 mm
  • 600mm x 200mm x 100 mm
  • 600mm x 200mm x 150 mm
  • 600mm x 200mm x 200 mm
  • 600mm x 200mm x 230 mm
  • 600mm x 200mm x 250 mm
  • 600mm x 200mm x 300 mm

Red Clay Bricks are available in sizes of 225 mm (length) x 115 mm (width) X 75 mm (Height).

6). Workability

Autoclaved Aerated Concrete blocks are lighter weight with higher strength which offers superior workability across all construction projects and requires less labor force. This eventually lessens labor costs enabling a good amount of cost savings at scale. When using AAC blocks, the number of joints is less which again results in a considerable savings of mortar as well as boosting construction speed, unlike the red bricks.  

7). Sustainability

AAC blocks are considered to be more environmentally friendly than red clay bricks because they use less material and energy in their production process. Additionally, AAC blocks can be easily recycled, while red clay bricks cannot.

8). Properties of AAC Block And  Red Clay Brick

AAC block and red clay bricks are two commonly used building materials. Let’s discuss their Properties individually

Properties of AAC Blocks

AAC blocks are lightweight, precast concrete blocks composed of fine aggregates, cement, lime, and aluminum powder. They undergo a curing process in an autoclave, resulting in a porous structure with air pockets. Here are some properties of AAC blocks

i). Strength

AAC blocks have good compressive strength, typically ranging from 3 to 7 N/mm². This strength is sufficient for most construction purposes.

ii). Resistance to Fire

AAC blocks offer excellent fire resistance due to their inorganic composition. They are classified as fire-resistant materials and can withstand high temperatures for a considerable duration.

iii). Moisture Resistance

AAC blocks have low water absorption, which makes them resistant to moisture-related problems such as cracking, efflorescence, and fungal growth.

iv). Termite and Pest Resistance

AAC blocks are inorganic and do not provide a food source for termites or pests, making them resistant to termite damage.

v). Longevity

When properly installed and maintained, AAC blocks have a long lifespan. They are known for their durability and resistance to weathering.

AAC Block and Red Clay Bricks

Properties of Red Clay Bricks

Red clay bricks are traditional building materials made from clay and fired in a kiln. They have been used for centuries in construction. Here are some durability aspects of red clay bricks:

i). Strength

Red clay bricks have high compressive strength, typically ranging from 7 to 15 N/mm², depending on the manufacturing process and brick quality.

ii). Resistance to Fire

Red clay bricks provide good fire resistance. They are non-combustible and can withstand high temperatures without significant structural damage.

iii). Moisture Resistance

Clay bricks have a moderate level of water absorption. They can absorb moisture, but with proper mortar and damp-proofing measures, their susceptibility to moisture-related issues can be minimized.

Related Video:- AAC Block and Red Clay Bricks

iv). Termite and Pest Resistance

Red clay bricks are organic materials and can be susceptible to termite infestation if not properly treated or protected.

v). Longevity

Red clay bricks have a long lifespan, and many historic structures made of clay bricks stand today as a testament to their durability. However, their longevity can be influenced by factors such as the quality of clay, the firing process, and maintenance.

Overall, both AAC Block and Red Clay Bricks are durable building materials. AAC blocks offer advantages such as lighter weight, better thermal insulation, and higher precision in size and shape. Red clay bricks, on the other hand, have a long-standing reputation and aesthetic appeal. The choice between them often depends on factors like project requirements, cost, availability, and personal preferences.

AAC Block and Red Clay Bricks

9). Comparison Between AAC Block And Red Clay Brick.

i). Cost Saving comparison

i). AAC blocks do not require any pre-curing. AAC block masonry joints are air-cured and need not require any curing. Infrastructure and labor involved in the curing process can be eliminated.

While,

Red Clay Bricks have to be soaked in water before using them in work.  Moreover, 7-day curing has to be done on brickwork. This requires setting up of curing infrastructure, and tabor involvement.

ii). AAC Block can save substantial labor costs incurred for mortar mixing and conveying.

Whereas,

Red Clay Bricks have extra labor cost involvement for mortar mixing and conveying.

iii). AAC blocks are supplied in pellets and can be easily lifted and conveyed to the work spots using cranes and towers directly from the trucks. Saves labor involvement in unloading, conveying, and lifting. Less handling generates zero wastage.

AAC Block and Red Clay Bricks

Whereas,

Red Clay Bricks are supplied in loose and are unloaded & conveyed manually to different places. They have to be filled in buckets before lifting to heights and involve lots of labor. Bricks shifting and conveying involve a lot of labor and generate a huge amount of wastage.

iv). AAC blocks got fewer mortar joints of 3-5 mm thickness this can save substantially in terms of jointing material.

Whereas,

Red Clay Brick masonry generates a 3-4 times higher number of joints of 12 mm thickness.

ii). Construction speed comparison

i). AAC blocks are factory-made and posse’s dimensional accuracy. So they are easy to place, plumb, and level.

Whereas,

Red bricks are locally made and are irregular with less dimensional accuracy. Bricks are very difficult to place, level, and plumb.

AAC Block and Red Clay Bricks

ii). AAC block got fewer joints and hence construction speed is high.

Whereas,

Red Brick got a larger number of joints (4 times) in comparison with AAC blocks and hence construction speed is drastically reduced.

AAC Block and Red Clay Bricks

iii). AAC blocks cover a larger area.

Whereas,

Red Clay Bricks cover less area.

iv). AAC blocks can even be placed with semiskilled workers due to their dimensional accuracy and shape.

Whereas,

Red Clay Bricks work can be done with the help of a skilled mason only, due to the inaccuracy and shape issues.

v). AAC blocks mostly use block adhesive for bonding and are available in ready-mix packs. The thickness of mortar joints ranges between 3-5 mm.

Whereas,

Red Clay Brickwork is done by site mixed mortar and has to be a minimum of 10 mm. The mortar thickness is high in the case of Red Clay brickwork.

Conclusion

The choice between (Autoclaved Aerated Concrete) AAC  block and red clay bricks ultimately depends on various factors, including the specific requirements of the project, local availability, cost considerations, and personal preferences. Both AAC block and red clay bricks have their own advantages and disadvantages, so it’s essential to assess them before making a decision.

AAC blocks are lightweight, precast concrete blocks that are manufactured with a combination of cement, lime, sand, and aluminum powder. They are known for their excellent thermal insulation properties, high strength, and fire resistance. AAC blocks are larger in size than traditional bricks, which reduces the number of joints in construction, leading to faster installation.

Related Video:- AAC Block and Red Clay Bricks

They also have good sound insulation properties. Additionally, AAC blocks are eco-friendly as they use fly ash, a waste product from thermal power plants, in their manufacturing process. However, AAC blocks may be more expensive than red clay bricks, and their availability might be limited in certain regions.

On the other hand, red clay bricks are made from natural clay that is molded and fired in kilns. They have been used for centuries and are known for their durability and strength. Red clay bricks are readily available in most regions, making them a convenient choice. They have good thermal mass, which helps regulate the temperature inside buildings, and they provide good sound insulation. Red clay bricks are also relatively cost-effective compared to AAC blocks.

AAC Block and Red Clay Bricks

However, they are heavier and require more mortar, which can increase construction time and costs. Additionally, red clay bricks have lower thermal insulation properties compared to AAC blocks.

In conclusion, if thermal insulation, lightweight construction, and faster installation are important considerations, AAC blocks could be a suitable choice. They offer excellent thermal properties, high strength, and fire resistance. On the other hand, if cost-effectiveness and availability are the primary factors, red clay bricks may be more suitable. They have a long history of use, durability, and relatively lower costs. It’s important to evaluate these factors based on your specific project requirements and consult with local experts or professionals to make an informed decision.

Thank you for taking the time to read this blog post about the difference between AAC Block and Red Clay Bricks. We hope that you found it informative and engaging. If you have any questions or comments, please feel free to leave comments in the comment section below. Don’t forget to check out our other educational posts on  myengineeringsupport.com for more learning opportunities!

Bar Bending Schedule (BBS) Basics Part -1

AAC Block and Red Clay Bricks

This Ebook is specially designed for Freshers Civil Engineers. Recommended for Quantity Surveyors & Billing Engineers. Here You Can Learn All Basic Concepts & Formulas for Bar Bending schedules (BBS).

I hope this information can be useful for you guys.

If you like this article then please share it with your friends & also like our Facebook Page and join our Telegram Channel.

If you want a PDF copy of this, Do let’s know by commenting & you can message us on our Instagram telegram channel,  or you can download it from the top right-hand corner of this post.

AAC Block and Red Clay Bricks 

Thanks For the Great Attention!

Good Bye & Take Care

Happy Learning 

AAC Block and Red Clay Bricks

Also, Read,

Mosaic v/s Terrazzo Floorings

Window AC v/s split AC 

AAC Block Quality Checklist

All About AAC Block – An Ultimate Guide

Advantages And Disadvantages Of AAC Blocks

Construction Cost of a 1000 sqft Slab in India

Related Video

AAC Block and Red Clay Bricks


AAC Blocks – 30 Main Advantages And Disadvantages Of AAC Blocks

Advantages And Disadvantages Of AAC Blocks

Autoclaved aerated concrete (AAC) blocks are a type of lightweight and highly insulating popular building material that is widely used in construction.

The manufacturing process involves combining cement, lime, water, and a small amount of aluminum powder to create a chemical reaction that forms millions of tiny air bubbles throughout the block. The resulting product is a durable and high-strength building material that has excellent insulation properties and is resistant to fire and moisture.

Like any other building material, AAC has numerous advantages & disadvantages over traditional building materials, making it an appealing choice for a wide range of construction projects, Here we’ll discuss 30 advantages and disadvantages of using AAC blocks in detail

Advantages Of AAC Block

1). Lightweight

The porous structure of AAC makes it significantly 3 to 4 times lighter than traditional bricks or concrete blocks. This makes transportation of AAC blocks both easier and more cost-effective. Additionally, This reduced weight translates to a lower overall load on a building’s structure, potentially reducing the need for reinforcement and enabling more flexible designs.

Advantages And Disadvantages Of AAC Blocks

The use of AAC blocks reduces a building’s overall dead load by up to 60%, making it possible to construct taller buildings. The weight of an AAC block can vary between 9-12 kg, depending on the level of moisture present.

2). Strength

AAC blocks, or Autoclaved Aerated Concrete blocks, are known for their excellent strength and durability. Despite being lightweight, these blocks have a compressive strength that is comparable to that of traditional concrete blocks. As per IS:2185 part III – AAC blocks have a compressive strength of 3 – 4 N/mm2. making them suitable for load-bearing walls & give higher stability to the building structure.

3). Ease Of Workability & Design Flexibility

Due to its lightweight nature and the fact that it can be easily cut, drilled, and shaped to fit any design requirements. It allows for easy installation of electrical and plumbing systems. AAC blocks are simple to install and work with. This can lead to faster construction times and lower labor costs. 

4). Blocks size  

AAC blocks are available in various sizes to meet the diverse needs of construction projects. The most common sizes of AAC blocks are:

S.No.

Particulars

     Size (L x B x H) in mm

1

Size 1

         600×200×75

2

Size 2

         600×200×100

3

Size 3

         600×200×150

4

Size 4

         600×200×200

5

Size 5

         625×240×75

6

Size 6

        625×240×100

7

Size 7

        625×240×150

8

Size 8

        625×240×200


 AAC Block
Advantages And Disadvantages Of AAC Blocks

These sizes are widely used in the construction of walls, slabs, and other structural components. However, it is important to note that the availability of AAC block sizes may vary depending on the manufacturer and location.

It is always advisable to check with the manufacturer or supplier to determine the availability of specific sizes and quantities before placing an order.

5). Thermal Insulation

The air pockets within AAC provide excellent thermal and acoustic insulation, making it an energy-efficient choice for building construction. This can result in reduced energy consumption for heating and cooling, as well as a quieter indoor environment.

6). Fire Resistance

AAC blocks that are highly fire-resistant(up to 1600° C). They are non-combustible and can withstand high temperatures for extended periods, enhancing the fire safety of a building. This makes it an excellent material for fire-resistant construction and enhances the overall safety of a building.

7). Eco-Friendly

The production process of AAC generates less waste and uses fewer natural resources compared to traditional building materials. They are made from non-toxic materials and consume less energy during production, making them environmentally friendly. In addition, the energy efficiency of AAC structures can help reduce the overall environmental impact.  

8). Earthquake-Resistant

AAC blocks offer excellent seismic performance, making them ideal for use in earthquake-prone areas. The lightweight nature of AAC blocks provides better resistance to earthquakes.

9). Pest-Resistant

AAC blocks are inorganic and do not support the growth of mold, fungi, or insects, making them ideal for use in areas prone to termite damage.

10). Fast Construction

AAC blocks are known for their fast construction properties, making them an ideal choice for construction projects that require a quick turnaround time. The lightweight nature of AAC blocks means that they can be easily transported and installed by just a few workers, reducing construction time and labor costs.

Advantages And Disadvantages Of AAC Blocks

Overall, the fast construction properties of AAC blocks make them an excellent choice for construction projects that require speed and efficiency without compromising on quality or durability.

11). Reduced Structural Load

The lightweight nature of AAC blocks reduces the overall load on the building’s structure.

12). Precision And Uniformity

AAC blocks are manufactured to strict dimensional tolerances, ensuring precise construction and reducing waste. They have accurate dimensions and uniformity, ensuring a consistent quality of construction.

ALL About AAC Block
Advantages And Disadvantages Of AAC Blocks

13). Reduced Construction Waste

The precision and uniformity of AAC blocks result in minimal waste during construction.

14). Moisture Resistance

AAC blocks have low water absorption, which means reducing the chances of dampness and water seepage. They are less likely to absorb moisture and cause damage.

15). Energy Efficiency

The thermal insulation properties of AAC blocks can help improve the energy efficiency of buildings, reducing energy consumption for heating, cooling, and costs.

16). Sound Insulation

AAC blocks offer excellent soundproofing & sound insulation properties, reducing noise transmission between rooms.

17). Non-Toxic

AAC blocks are non-toxic, making them safe for use in homes and buildings.

18). Versatile

AAC blocks can be used for a wide range of construction applications, including walls, floors, and roofs.

19). Long Lifespan

AAC blocks have a long lifespan and require minimal maintenance, reducing long-term costs.

20). Improved Indoor Air Quality

AAC blocks are made from natural materials and do not emit any harmful gases, which can improve indoor air quality.

Advantages And Disadvantages Of AAC Blocks

21). Easy To Transport

AAC blocks are lightweight and can be transported in large quantities, reducing transportation costs.

22). Resistant To Weathering

AAC blocks are highly resistant to weathering and can withstand extreme temperatures, making them ideal for use in harsh environments.

23). Stable Dimensions

AAC blocks have stable dimensions, which means they do not expand or contract with changes in temperature and humidity.

24). Easy to plaster

AAC blocks are easy to plaster, reducing construction time and labor costs.

25). Reduced Carbon Footprint

AAC blocks require minimal energy to manufacture, reducing their carbon footprint.

26). Reduced Waste

AAC blocks generate minimal waste during production and can be recycled or reused.

27). Improved Indoor Comfort

AAC blocks offer excellent thermal insulation properties, which can improve indoor comfort.

28). Improved Indoor Humidity Control

AAC blocks offer excellent humidity control properties, reducing the risk of mold and mildew growth.

29). Enhanced Design Flexibility

AAC blocks can be easily customized to fit any design requirements.

30). Cost-Effective

The cost of AAC blocks may vary based on factors such as location, manufacturer, and size, they generally have a higher cost per unit compared to traditional red bricks.

However, despite the higher cost, AAC blocks can offer significant savings in terms of transportation, handling, and installation due to their lightweight nature. Additionally, AAC blocks have excellent insulation properties, which can help reduce energy costs over the life of the building.

Overall, while the cost of AAC blocks may be higher initially, their unique properties make them a cost-effective and sustainable building material in the long run. Despite their numerous advantages, AAC blocks are relatively affordable compared to other building materials.

ALL About AAC Block
Advantages And Disadvantages Of AAC Blocks

Technical Specification Of AAC Blocks 

AAC blocks are available in various sizes to meet the diverse needs of construction projects. The most common sizes of AAC blocks are:

S.No.

Parameter

     Specification

1

Density Oven Dry

    500 to 700 kg/m3

2

Shear Strength 0.1 to 0.6 N/m2

3

Compressive strength

3 to 4 N/mm2 (MPa)

4

Modulus of Elasticity

2040 Mpa

5

Variation in dimensions

      +/-1mm

6

Water Absorption

10-12%

7

Thermal Conductivity “K”

0.16 – 0.18 W/(K-m)

8

Drying Shrinkage

0.04%-0.06%

9

Sound Absorption

0.35 to 0.60

10

Fire Resistant

4 Hrs (for 200 mm wall)

Uses Of AAC Blocks

AAC (Autoclaved Aerated Concrete) blocks are versatile building materials that can be used in a variety of construction projects. Here are some of the common uses of AAC blocks:

i). Load-bearing Walls: AAC blocks can be used to construct load-bearing walls due to their high compressive strength.

ii). Non-Load-bearing Walls: AAC blocks can also be used to construct non-load-bearing walls, such as partitions or infill walls.

iii). Floors and Roofs: AAC blocks can be used as a lightweight alternative to traditional concrete blocks or clay bricks for constructing floors and roofs.

iv). Firewalls: AAC blocks have excellent fire resistance properties and can be used to construct firewalls.

v). Sound Barriers: AAC blocks have good acoustic insulation properties and can be used as sound barriers in buildings located near highways or busy roads.

vi). Prefabricated Structures: AAC blocks can be used to construct prefabricated structures such as precast walls, precast slabs, and precast panels.

vii). Retaining Walls: AAC blocks can be used to construct retaining walls in landscaping and civil engineering projects.

viii). Cladding: AAC blocks can be used as cladding for buildings to improve their aesthetics and provide thermal insulation.

ix). Lintels and Beams: AAC blocks can be used to construct lintels and beams in buildings.

Disadvantages Of AAC Block

 1). Initial Cost

The initial cost of AAC blocks is generally higher than that of traditional concrete blocks.

2). Limited Color Options

These blocks typically come in a limited range of colors, which may impact aesthetics.

3). Sealing And Finishing

Additional sealing and finishing treatments may be required to protect the blocks from moisture and UV damage.

Advantages And Disadvantages Of AAC Blocks

4). Not Suitable For All Climates

AAC blocks may not perform well in extremely cold or wet climates without proper moisture management.

5). Susceptible To Damage

They can be more easily damaged during transport or handling compared to traditional concrete blocks.

6). Specialized Tools

Specialized tools may be needed to cut or shape the blocks, which can increase construction costs.

7). Lower Sound Insulation For Impact Noise

While they provide good sound insulation for airborne noise, they may not be as effective for impact noise.

8). May Require Additional Reinforcement

In some cases, additional reinforcement may be needed for load-bearing walls or other structural elements.

9). Limited Recycling Options

Unlike traditional concrete blocks, AAC blocks have limited recycling potential.

10). Long Curing Time

AAC blocks require a longer curing time compared to traditional concrete blocks, which may delay construction.

11). Susceptible To Freeze-Thaw Cycles

In cold climates, AAC blocks can be more susceptible to damage from freeze-thaw cycles if not properly protected.

12). Limited Availability

AAC blocks may not be readily available in all locations, making them more difficult to obtain and increasing construction costs.

13). Fragility

AAC blocks are relatively fragile and can easily break or crack during transport or installation.

14). Limited Strength

Although AAC blocks are strong, they may not be as strong as other building materials, such as concrete or brick.

15). Lower Tensile Strength

They have a lower tensile strength compared to traditional concrete blocks, which might limit their use in certain applications.

Advantages And Disadvantages Of AAC Blocks

16). High Transportation Costs

Because AAC blocks are lightweight, they can take up a lot of space during transport, which can lead to high transportation costs.

17). Limited Availability Of Skilled Labor

The installation of AAC blocks may require skilled labor, which may not be readily available in all areas.

18). Limited Load-Bearing Capacity

AAC blocks may not have the same load-bearing capacity as other building materials, which can limit their use in certain applications. AAC blocks are suitable only for partition walls.

19). Limited Durability

While AAC blocks are durable, they may not last as long as other building materials, such as brick or stone.

20). Limited Resistance To High Winds

AAC blocks may not be as resistant to high winds as other building materials, which can limit their use in areas with high winds.

21). Difficulty With Retrofitting

Retrofitting existing structures with AAC blocks can be difficult and expensive.

22). Limited Availability Of Skilled Installers

The installation of AAC blocks may require specialized skills, which may not be readily available in all areas. Skilled labor is required for proper installation and construction with AAC blocks.

However, some drawbacks of AAC blocks include limited availability in certain regions, higher initial costs compared to traditional materials, and potential susceptibility to moisture damage if not adequately protected. Despite these limitations, AAC blocks are a popular choice in many construction projects due to their numerous benefits.

Thank you for taking the time to read this educational blog post about the Advantages And Disadvantages Of AAC Blocks. We hope that you found it informative and engaging. If you have any questions or comments, please feel free to leave comments in the comment section below. Don’t forget to check out our other educational posts on  myengineeringsupport.com for more learning opportunities!

Bar Bending Schedule (BBS) Basics Part -1

 Advantages And Disadvantages Of AAC Blocks
Advantages And Disadvantages Of AAC Blocks

This Ebook is specially designed for Freshers Civil Engineers. Recommended for Quantity Surveyors & Billing Engineers. Here You Can Learn All Basic Concepts & Formulas for Bar Bending schedules (BBS).

I hope this information can be useful for you guys.

If you like this article then please share it with your friends & also like our Facebook Page and join our Telegram Channel.

If you want a PDF copy of this, Do let’s know by commenting & you can message us on our Instagram & telegram channel,  or you can download it from the top right-hand corner of this post.

Advantages And Disadvantages Of AAC Blocks
Advantages And Disadvantages Of AAC Blocks 

Thanks For the Great Attention!

Good Bye & Take Care

Happy Learning 

Also, Read,

All About AAC Block – An Ultimate Guide

AAC Blocks Manufacturing Process – An Ultimate Guide

How To Check The Quality of AAC Block

MDF VS Particle Board – 15 Important Differences

Flush Door vs Wooden Panel Door 

Related Video


All About AAC Block – An Ultimate Guide

All About AAC Block – An Ultimate Guide

What is AAC Block

AAC stands for Autoclaved Aerated Concrete, a type of building material that is lightweight and precast. It’s made from natural ingredients such as cement, lime, sand, water, and a small amount of aluminum powder.

ALL About AAC Block
ALL About AAC Block

The aluminum powder reacts with the other ingredients to produce tiny air pockets, which give the AAC block its lightweight and highly insulating properties. Once poured into molds, it is cured under high pressure and temperature in an autoclave, which provides strength and durability.

ALL About AAC Block
ALL About AAC Block

AAC blocks are a popular choice for construction projects due to their lightweight nature, ease of installation, energy efficiency, excellent thermal insulation, and soundproofing properties. They are also fire-resistant and have a high load-bearing capacity, making them a reliable choice for building walls, floors, and roofs.

When AAC block was first invented?

AAC (Autoclaved Aerated Concrete) blocks are a relatively new building material that has gained popularity in recent years due to their unique properties, which make them an excellent alternative to traditional concrete blocks. It has been used in construction since the early 20th century. The invention of AAC blocks is credited to a Swedish architect and inventor named Johan Axel Eriksson, who developed the material in the early 1920s.

The team was inspired by the properties of naturally occurring pumice stone, which is lightweight and porous. Their goal was to create a material that combined the strength and durability of concrete with the insulating properties and workability of pumice. After several years of experimentation, Eriksson and his team developed a method to create lightweight and aerated concrete by adding an expansion agent, which resulted in the formation of small air pockets within the material.

ALL About AAC Block
ALL About AAC Block

Eriksson was interested in finding a building material that was both lightweight and strong, and that would also provide good insulation properties. He began experimenting with different mixtures of cement, lime, water, and sand, along with various additives such as aluminum powder and gypsum.

In 1924, Eriksson patented a new type of building material that he called “aerated concrete,” which was made by combining cement, lime, and water with a small amount of aluminum powder. This mixture was then poured into molds and allowed to cure for several hours before being steam-cured in an autoclave.

ALL About AAC Block

The aluminum powder in the mixture reacted with the lime and water to produce hydrogen gas, which expanded the mixture and created a large number of small, uniformly distributed air pockets throughout the material. This gave the material its lightweight and insulating properties while also providing it with good strength and durability.

Eriksson’s invention quickly gained popularity in Sweden, and AAC blocks were used in a variety of construction projects, including residential and commercial buildings, bridges, and even ships. The material was particularly popular in the Scandinavian countries, where the harsh climate and high cost of energy made it essential to have buildings with good insulation properties.

ALL About AAC Block
ALL About AAC Block

Over the years, the process for making AAC blocks has been refined and improved, with the addition of new additives and the development of more efficient production methods. Today, AAC blocks are made using a mixture of cement, lime, fly ash or sand, and water, along with small amounts of additives such as aluminum powder, silica fume, and gypsum.

The manufacturing process for AAC blocks involves several steps. First, the raw materials are mixed together in a mixer to form a slurry. This slurry is then poured into molds, which are then placed in an autoclave for several hours of steam-curing.

During the steam-curing process, the aluminum powder reacts with the lime and water to produce hydrogen gas, which expands the mixture and creates characteristic air pockets. The autoclave provides the necessary heat and pressure to cure the blocks and ensure that they are strong and durable.

After the blocks are cured, they are removed from the molds and stacked in a warehouse for several weeks to allow them to dry and cure further. Once they are dry, they are ready to be used in construction projects.

AAC blocks have many advantages over traditional concrete blocks. They are lightweight, which makes them easy to handle and transport, and they have excellent insulation properties, which can help reduce heating and cooling costs in buildings. They are also strong and durable, with good resistance to fire, water, and pests.

In addition to their practical advantages, AAC blocks are also environmentally friendly. They are made from natural materials and do not produce any toxic byproducts during the manufacturing process. They are also recyclable and can be crushed and reused as raw material for new blocks.

Today, AAC blocks are used in construction projects around the world and are known for their strength, durability, and environmental friendliness.

Manufacturing Process

The manufacturing process of AAC blocks consists of the following steps:

i). Raw material preparation 

The raw materials (sand, cement, lime, and water) are proportioned and mixed together.

ii). Expansion agent addition

Aluminum powder is added to the mixture, which reacts with the other components to produce hydrogen gas. This process causes the mixture to expand and create characteristic air pockets.

iii). Molding and Cutting

The aerated concrete mixture is poured into molds and allowed to be partially set. Once it reaches the desired consistency, it is cut into blocks or panels.

ALL About AAC Block
ALL About AAC Block

iv). Curing

The cut blocks are then placed in an autoclave (a high-pressure steam chamber) and subjected to high-pressure steam at temperatures around 180-210°C (356-410°F) for 12 to 16 hours. This process strengthens the blocks and enhances their durability.

v). Packaging and storage

After the autoclaving process, the AAC blocks are removed, allowed to cool, and then packaged for storage or transportation.

Future of AAC blocks

The future of Autoclaved Aerated Concrete (AAC) blocks appears promising due to the growing demand for environmentally friendly and energy-efficient construction materials. Some trends and developments expected to shape the future of AAC blocks include:

i). Increased Adoption

As awareness about the benefits of AAC blocks grows, more builders, architects, and developers are expected to adopt these lightweight, energy-efficient, and environmentally friendly materials in their construction projects. This adoption will likely be accelerated by favorable government policies and incentives promoting green construction.

ALL About AAC Block

ii). Technological Advancements

As the industry matures, we can expect further innovations in the manufacturing process, leading to improved performance, higher quality, and potentially lower production costs. This can make AAC blocks even more attractive to the construction industry.

iii). Customization And Prefabrication

The future may see an increase in customized AAC blocks designed for specific applications and prefabricated AAC panels that can be easily assembled on-site. This will help reduce construction time, lower labor costs, and improve overall project efficiency.

iv). Focus On Sustainability

As the global focus on sustainability intensifies, the demand for eco-friendly building materials like AAC blocks will grow. This will likely lead to the development of even more sustainable AAC blocks with improved thermal insulation and reduced environmental impact.

v). Integration with Smart Technology

The construction industry is gradually integrating smart technology to improve the efficiency and performance of buildings. In the future, we may see AAC blocks incorporating sensors and other smart technologies to monitor and optimize a building’s performance.

ALL About AAC Block
ALL About AAC Block

vi). Global Expansion

Although AAC blocks are already widely used in Europe and parts of Asia, there is still significant potential for growth in other markets such as North America, Africa, and South America. Increased awareness of AAC blocks’ benefits and favorable government policies may lead to greater adoption in these regions.

In summary, the future of AAC blocks looks bright due to their numerous advantages and the growing global focus on sustainable construction practices. Technological advancements, increased adoption, and integration with smart technology are some of the trends that will likely shape the future of this industry.

Thank you for taking the time to read this educational blog post about the ALL About AAC Block. We hope that you found it informative and engaging. If you have any questions or comments, please feel free to leave comments in the comment section below. Don’t forget to check out our other educational posts on  myengineeringsupport.com for more learning opportunities!

Bar Bending Schedule (BBS) Basics Part -1

ALL About AAC Block

This Ebook is specially designed for Freshers Civil Engineers. Recommended for Quantity Surveyors & Billing Engineers. Here You Can Learn All Basic Concepts & Formulas for Bar Bending schedules (BBS).

I hope this information can be useful for you guys.

If you like this article then please share it with your friends & also like our Facebook Page and join our Telegram Channel.

If you want a PDF copy of this, Do let’s know by commenting & you can message us on our Instagram & telegram channel,  or you can download it from the top right-hand corner of this post.

  AAC Blocks Manufacturing Process 
AAC Blocks Manufacturing Process 

Thanks For the Great Attention!

Good Bye & Take Care

Happy Learning 

Also, Read,

AAC Blocks Manufacturing Process – An Ultimate Guide

How To Check The Quality of AAC Block

28 Important Comparison between WPC and PVC Wall Panel

MDF VS Particle Board – 15 Important Differences

Flush Door vs Wooden Panel Door 

 Related Video

ALL About AAC Block


10 Important AAC Block Quality Checklist – How To Check The Quality of AAC Block

AAC Block Quality Checklist

AAC blocks, also known as Autoclaved Aerated Concrete blocks, are a type of lightweight concrete block made of natural raw materials like cement, sand, water, and gypsum. They are an eco-friendly and sustainable option for construction, as they require less energy and resources to produce, have excellent insulation properties, and are resistant to fire and pests.

However, it is essential to ensure the quality of AAC blocks before using them in construction to avoid any safety or durability issues. In this article, we will discuss in detail how to check the quality of AAC blocks.

The AAC block quality checklist can be divided into the following stages:

1). Visual inspection 

2). Density

3). Compressive strength

4). Sound insulation

5). Thermal conductivity

6). Water absorption

7). Efflorescence

8). Fire resistance

9). Dimensional accuracy:

10). Durability

Let’s Discuss this in detail AAC block quality checklist

1). Visual Inspection

The first step in checking the quality of AAC blocks is a visual inspection. It involves a thorough examination of the blocks for any physical defects or irregularities. The blocks should have a uniform shape and size, and their edges should be straight and clean. The surface should be smooth and free from any cracks, chips, or other defects. Any block with visible cracks, chips, or deformities should be rejected.

Visual inspection is a quick and easy way to identify any issues with the blocks before using them in construction

In this section, we will discuss the various aspects of visual inspection of AAC blocks in detail.

1). Shape and size

The blocks should have a uniform shape and size. The edges should be straight and clean, and the surface should be smooth. The blocks should be free from any cracks, chips, or other defects. Any block with visible cracks, chips, or deformities should be rejected.

2). Surface texture

The surface of the block should be smooth and free from any blemishes. The texture of the block should be consistent throughout. Any block with an uneven or rough surface should be rejected.

3). Color

The color of the blocks should be uniform and consistent. Any variation in color may indicate a difference in the quality of raw materials used in the manufacturing process.

3). Cracking

Any visible cracks on the surface or interior of the block should be rejected as it can lead to reduced strength and durability.

4). Shape irregularities

Any irregularities in the shape or size of the block can lead to improper alignment and fitting during construction, resulting in weaker walls or structures.

5). Surface defects

Surface defects such as chips, dents, or uneven surfaces can affect the overall appearance of the structure and reduce its aesthetic appeal.

6). Moisture content

Moisture content can affect the overall strength and durability of the block. The blocks should be free from any moisture or dampness, which can lead to cracking or warping during the drying process.

2). Density  

The density of AAC blocks is an essential factor in determining their strength, durability, and insulation properties. It is crucial to check the density of AAC blocks during quality control to ensure that the blocks meet the required specifications for their intended use. 

Let’s See the procedure

i). Sampling

The first step in density inspection is sampling. Samples should be randomly selected from the batch of AAC blocks to ensure that the testing is representative of the entire batch.

ii). Measuring dimensions

The length, width, and height of each block should be measured using a digital caliper or ruler to determine the volume of the block. The dimensions should be measured at three different points, and the average value should be taken.

iii). Weighing the block

The block should be weighed using a digital weighing scale to determine its mass. The weighing scale should have a precision of at least 0.1 grams.

iv). Calculation of density

The density of the block can be calculated by dividing the mass of the block by its volume. The formula for calculating the density of the block is:

Density = Mass (in kg) / Volume (in m3)

iv). Comparison with standards

The density of AAC blocks should be between 550 to 650 kg/m3. The measured density of the block should be compared with the required standards to determine if it meets the required specifications.

v). Identification of blocks with low density

If the measured density of the block is lower than the required standard, it indicates that the block may not have the required strength or insulation properties. Blocks with low density should be rejected and not used in construction.

vi). Identification of blocks with high density

If the measured density of the block is higher than the required standard, it indicates that the block may not have the desired insulation properties. Blocks with high density can be used in construction, but their insulation properties may not be as effective as blocks with the desired density.

vii). Repeat the test

In case of any doubts, the test should be repeated on a new sample of blocks to ensure that the results are accurate and consistent.

viii). Record keeping

The results of the density inspection should be recorded and maintained for future reference. This will help in tracking the quality of the blocks over time and identifying any trends or issues.

The density of AAC blocks is a crucial factor in determining their strength and durability. The density of AAC blocks should be between 550 to 650 kg/m3. A block with a density lower than 550 kg/m3 may not have the required strength, while a block with a density higher than 650 kg/m3 may not have the desired insulation properties.

Density inspection is an essential part of quality control or AAC block quality checklist. It is crucial to ensure that the blocks meet the required density specifications to ensure their strength, durability, and insulation properties. Any block with low density should be rejected, while blocks with high density can be used but may not provide the desired insulation properties. Accurate and consistent testing, record-keeping, and attention to detail are crucial for the successful density inspection of AAC blocks.

3). Compressive Strength 

Compressive strength is one of the most important parameters for determining the quality and durability of AAC blocks. Compressive strength is the maximum load that a block can bear without breaking under compression. It is crucial to check the compressive strength of AAC blocks during quality control to ensure that the blocks meet the required specifications for their intended use.

In this section, we will discuss the detailed process of compressive strength inspection of AAC blocks.

i). Sampling

The first step in compressive strength inspection is sampling. Samples should be randomly selected from the batch of AAC blocks to ensure that the testing is representative of the entire batch.

ii). Preparation of test specimens

The samples should be cut to prepare test specimens with a size of 150mm x 150mm x 150mm or 100mm x 100mm x 100mm using a diamond saw. The surface of the test specimens should be smooth and free from any defects or irregularities.

iii). Curing

The test specimens should be cured in a water tank or curing chamber for a minimum of 24 hours to ensure that they are fully hydrated and have achieved their maximum strength.

iv). Testing machine

The compressive strength of the test specimens should be measured using a compression testing machine. The testing machine should have a capacity of at least 2000 kN and should comply with the relevant standards.

v). Placing the specimen

The test specimen should be placed on the base plate of the testing machine, and the load should be applied uniformly and steadily until the block fails.

vi). Calculation of compressive strength

The compressive strength of the block can be calculated by dividing the maximum load that the block can bear by its cross-sectional area. The formula for calculating the compressive strength of the block is:

Compressive strength = Maximum load (in N) / Cross-sectional area (in mm2)

vii). Comparison with standards

The compressive strength of AAC blocks should be above 3 N/mm2. The measured compressive strength of the block should be compared with the required standards to determine if it meets the required specifications.

viii). Identification of blocks with low compressive strength

If the measured compressive strength of the block is lower than the required standard, it indicates that the block may not have the required strength and durability. Blocks with low compressive strength should be rejected and not used in construction.

ix). Repeat the test

In case of any doubts, the test should be repeated on a new sample of blocks to ensure that the results are accurate and consistent.

x). Record keeping

The results of the compressive strength inspection should be recorded and maintained for future reference. This will help in tracking the quality of the blocks over time and identifying any trends or issues.

The compressive strength of AAC blocks should be above 3 N/mm2. Any block with a compressive strength lower than 3 N/mm2 should be rejected.

Compressive strength inspection is an essential part of the AAC block quality checklist. It is crucial to ensure that the blocks meet the required compressive strength specifications to ensure their strength and durability. Any block with low compressive strength should be rejected, while blocks with high compressive strength can be used with confidence. Accurate and consistent testing, record-keeping, and attention to detail are crucial for successful compressive strength inspection of AAC blocks.

AAC Block Quality Checklist

4). Sound Insulation 

Sound insulation is an essential property of AAC blocks, making them ideal for use in constructions that require high levels of soundproofing. It is crucial to check the sound insulation quality of AAC blocks during quality control to ensure that the blocks meet the required specifications for their intended use.

AAC blocks are known for their excellent sound insulation properties. To check the sound insulation quality of AAC blocks, a sound transmission test can be conducted. In this test, the sound is transmitted through the block, and the level of noise reduction is measured. The higher the noise reduction, the better the sound insulation quality of the block.

In this section, we will discuss the detailed process of sound insulation inspection of AAC blocks.

i). Sampling

The first step in sound insulation inspection is sampling. Samples should be randomly selected from the batch of AAC blocks to ensure that the testing is representative of the entire batch.

Testing Apparatus

The sound insulation quality of AAC blocks can be measured using a sound transmission test. The testing apparatus consists of a speaker, an amplifier, a sound level meter, and two test chambers.

ii). Testing procedure

The test specimens should be placed in the test chambers, and the speaker should be placed in the source chamber. The amplifier should be used to produce a specific sound frequency, which is transmitted through the specimen to the receiving chamber. The sound level meter is used to measure the noise reduction achieved by the block.

iii). Noise reduction coefficient (NRC)

The noise reduction coefficient (NRC) is a measure of the sound absorption capacity of a material. The NRC of AAC blocks should be above 0.5. The measured NRC of the block should be compared with the required standards to determine if it meets the required specifications.

iv). Comparison with standards

The measured sound insulation quality of the block should be compared with the required standards to determine if it meets the required specifications.

v). Identification of blocks with low sound insulation quality

If the measured sound insulation quality of the block is lower than the required standard, it indicates that the block may not have the desired soundproofing properties. Blocks with low sound insulation quality should be rejected and not used in constructions that require high levels of soundproofing.

vi). Repeat the test

In case of any doubts, the test should be repeated on a new sample of blocks to ensure that the results are accurate and consistent.

vii). Record keeping

The results of the sound insulation inspection should be recorded and maintained for future reference. This will help in tracking the quality of the blocks over time and identifying any trends or issues.

Sound insulation inspection is an essential part of quality control for AAC blocks. It is crucial to ensure that the blocks meet the required sound insulation specifications to ensure their suitability for constructions that require high levels of soundproofing. Any block with low sound insulation quality should be rejected, while blocks with high sound insulation quality can be used with confidence.

Accurate and consistent testing, record-keeping, and attention to detail are crucial for successful sound insulation inspection of AAC blocks.

5). Thermal Conductivity  

Thermal conductivity is an important property of AAC blocks, making them ideal for use in constructions that require high levels of insulation. It is crucial to check the thermal conductivity of AAC blocks during quality control to ensure that the blocks meet the required specifications for their intended use.

In this section, we will discuss the detailed process of thermal conductivity inspection of AAC blocks.

i). Sampling

The first step in thermal conductivity inspection is sampling. Samples should be randomly selected from the batch of AAC blocks to ensure that the testing is representative of the entire batch.

ii). Testing Apparatus

The thermal conductivity of AAC blocks can be measured using a thermal conductivity meter. The testing apparatus consists of a sensor, a heating element, and a temperature-measuring device.

iii). Testing procedure

The test specimens should be placed in the testing apparatus, and the sensor should be placed at the center of the block. The heating element is then used to heat one side of the block, and the temperature measuring device is used to measure the temperature on both sides of the block.

iv). Calculation of thermal conductivity

The thermal conductivity of the block can be calculated using the following formula:

Thermal conductivity = Heat flow (in W/mK) / (Temperature difference x Thickness)

v). Comparison with standards

The thermal conductivity of AAC blocks should be below 0.22 W/mK. The measured thermal conductivity of the block should be compared with the required standards to determine if it meets the required specifications.

vi). Identification of blocks with high thermal conductivity

If the measured thermal conductivity of the block is higher than the required standard, it indicates that the block may not have the desired insulation properties. Blocks with high thermal conductivity should be rejected and not used in constructions that require high levels of insulation.

vii). Repeat the test

In case of any doubts, the test should be repeated on a new sample of blocks to ensure that the results are accurate and consistent.

viii). Record keeping

The results of the thermal conductivity inspection should be recorded and maintained for future reference. This will help in tracking the quality of the blocks over time and identifying any trends or issues.

The thermal conductivity of AAC blocks is another crucial factor in determining their insulation properties. The thermal conductivity of AAC blocks should be between 0.14 to 0.18 W/mK. A block with a higher thermal conductivity value will allow more heat to pass through it, reducing its insulation properties.

Any block with high thermal conductivity should be rejected, while blocks with low thermal conductivity can be used with confidence. Accurate and consistent testing, record-keeping, and attention to detail are crucial for the successful thermal conductivity inspection of AAC blocks.

AAC Block Quality Checklist

6). Water Absorption  

Water absorption is an important property of AAC blocks, making them suitable for use in construction in humid and coastal areas. It is crucial to check the water absorption of AAC blocks during quality control to ensure that the blocks meet the required specifications for their intended use.

In this section, we will discuss the detailed process of water absorption inspection of AAC blocks.

i). Sampling

The first step in water absorption inspection is sampling. Samples should be randomly selected from the batch of AAC blocks to ensure that the testing is representative of the entire batch.

ii). Weighing the block

The weight of the dry block should be recorded using a digital weighing scale with a precision of at least 0.1 grams.

iii). Soaking the block

The dry block should be soaked in water for a period of 24 hours.

iv). Weighing the soaked block

After 24 hours of soaking, the block should be removed from the water and any excess water should be wiped off with a towel. The weight of the soaked block should be recorded using the same weighing scale used for the dry block.

v). Calculation of water absorption

The water absorption of the block can be calculated using the following formula:

Water absorption = (Weight of soaked block – Weight of dry block) / Weight of dry block x 100

vi). Comparison with standards

The water absorption of AAC blocks should be less than 10% of their weight. The measured water absorption of the block should be compared with the required standards to determine if it meets the required specifications.

vii). Identification of blocks with high water absorption

If the measured water absorption of the block is higher than the required standard, it indicates that the block may not have the desired water resistance properties. Blocks with high water absorption should be rejected and not used in constructions in humid and coastal areas.

viii). Repeat the test

In case of any doubts, the test should be repeated on a new sample of blocks to ensure that the results are accurate and consistent.

ix). Record keeping

The results of the water absorption inspection should be recorded and maintained for future reference. This will help in tracking the quality of the blocks over time and identifying any trends or issues.

AAC blocks are known for their low water absorption properties, making them ideal for construction in humid and coastal areas. The water absorption of AAC blocks should be less than 10% of their weight. Any block with high water absorption should be rejected, while blocks with low water absorption can be used with confidence. 

Accurate and consistent testing, record-keeping, and attention to detail are crucial for successful water absorption inspection of AAC blocks.

7). Efflorescence  

Efflorescence is a common problem in AAC blocks, and it can lead to a deterioration in their quality and appearance. It is crucial to check the efflorescence of AAC blocks during quality control to ensure that the blocks meet the required specifications for their intended use.

Efflorescence is the white powdery substance that appears on the surface of concrete or masonry due to the presence of salts. To check the efflorescence of AAC blocks, a visual inspection can be conducted. If there is any white powdery substance on the surface of the block, it indicates the presence of salts and should be rejected.

In this section, we will discuss the detailed process of efflorescence inspection of AAC blocks.

i). Sampling

The first step in efflorescence inspection is sampling. Samples should be randomly selected from the batch of AAC blocks to ensure that the testing is representative of the entire batch.

ii). Preparation of test specimens

The samples should be cut to prepare test specimens with a size of 100mm x 100mm x 25mm using a diamond saw. The surface of the test specimens should be smooth and free from any defects or irregularities.

iii). Soaking the block

The test specimens should be soaked in water for a period of 48 hours.

iv). Drying the block

After 48 hours of soaking, the test specimens should be removed from the water and allowed to air dry for a period of 72 hours.

v). Observation

The test specimens should be observed for the presence of efflorescence. Efflorescence is a white, powdery substance that appears on the surface of the block when moisture seeps through the surface and evaporates, leaving behind salts.

vi). Comparison with standards

The presence of efflorescence on AAC blocks is not acceptable. The test specimens should be compared with the required standards to determine if they meet the required specifications.

vii). Identification of blocks with efflorescence

If efflorescence is present on the test specimens, it indicates that the block may not have the desired quality and appearance. Blocks with efflorescence should be rejected and not used in construction.

viii). Repeat the test

In case of any doubts, the test should be repeated on a new sample of blocks to ensure that the results are accurate and consistent.

ix). Record keeping

The results of the efflorescence inspection should be recorded and maintained for future reference. This will help in tracking the quality of the blocks over time and identifying any trends or issues.

Efflorescence inspection is an essential part of quality control for AAC blocks. It is crucial to ensure that the blocks are free from efflorescence to ensure their quality and appearance. Any block with efflorescence should be rejected, while blocks without efflorescence can be used with confidence.

Accurate and consistent testing, record-keeping, and attention to detail are crucial for successful efflorescence inspection of AAC blocks.

8). Fire Resistant  

Fire resistance is an important property of AAC blocks, making them ideal for use in constructions where fire safety is a concern. It is crucial to check the fire resistance of AAC blocks during quality control to ensure that the blocks meet the required specifications for their intended use. 

AAC blocks are known for their excellent fire resistance properties, making them ideal for use in buildings with high fire risk. The fire resistance of AAC blocks can be tested by subjecting them to high temperatures and measuring their ability to resist fire. The blocks should have a fire-resistance rating of at least two hours.

In this section, we will discuss the detailed process of fire resistance inspection of AAC blocks.

i). Sampling

The first step in fire resistance inspection is sampling. Samples should be randomly selected from the batch of AAC blocks to ensure that the testing is representative of the entire batch.

ii). Testing Apparatus

The fire resistance of AAC blocks can be measured using a fire resistance test. The testing apparatus consists of a furnace, a temperature-measuring device, and a timer.

iii). Testing Procedure

The test specimens should be placed in the furnace, and the temperature should be raised to 750°C over a period of 30 minutes. The temperature should be maintained at 750°C for a period of 2 hours, and the timer should be used to record the time taken for the block to fail.

iv). Comparison with Standards

The fire resistance of AAC blocks should be at least 2 hours. The measured fire resistance of the block should be compared with the required standards to determine if it meets the required specifications.

v). Identification of blocks with low fire resistance

If the measured fire resistance of the block is lower than the required standard, it indicates that the block may not have the desired fire safety properties. Blocks with low fire resistance should be rejected and not used in constructions where fire safety is a concern.

vi). Repeat the test

In case of any doubts, the test should be repeated on a new sample of blocks to ensure that the results are accurate and consistent.

vii). Record Keeping

The results of the fire resistance inspection should be recorded and maintained for future reference. This will help in tracking the quality of the blocks over time and identifying any trends or issues.

Fire resistance inspection is an essential part of quality control for AAC blocks. It is crucial to ensure that the blocks meet the required fire resistance specifications to ensure their suitability for constructions where fire safety is a concern. Any block with low fire resistance should be rejected, while blocks with high fire resistance can be used with confidence.

Accurate and consistent testing, record-keeping, and attention to detail are crucial for successful fire resistance inspection of AAC blocks.

9). Dimensional Accuracy  

Dimensional accuracy is an important property of AAC blocks, making them suitable for use in constructions where precise measurements are necessary. It is crucial to check the dimensional accuracy of AAC blocks during quality control to ensure that the blocks meet the required specifications for their intended use. 

The dimensional accuracy of AAC blocks is critical for ensuring their proper fit and alignment during construction. The blocks should have a uniform size and shape, with straight edges and corners. The length, width, and height of the blocks should be within the specified tolerances.

In this section, we will discuss the detailed process of dimensional accuracy inspection of AAC blocks.

i). Sampling

The first step in dimensional accuracy inspection is sampling. Samples should be randomly selected from the batch of AAC blocks to ensure that the testing is representative of the entire batch.

ii). Preparation of test specimens

The samples should be cut to prepare test specimens with a size of 100mm x 100mm x 100mm using a diamond saw. The surface of the test specimens should be smooth and free from any defects or irregularities.

iii). Measuring the dimensions

The dimensions of the test specimens should be measured using a digital caliper with a precision of at least 0.1mm. The length, width, and height of each test specimen should be measured at three different points, and the average of these measurements should be recorded.

iv). Comparison with standards

The dimensions of AAC blocks should be within a tolerance of ± 1mm. The measured dimensions of the test specimens should be compared with the required standards to determine if they meet the required specifications.

v). Identification of blocks with low dimensional accuracy

If the measured dimensions of the test specimens are outside the required tolerance, it indicates that the block may not have the desired dimensional accuracy. Blocks with low dimensional accuracy should be rejected and not used in constructions where precise measurements are necessary.

vi). Repeat the test

In case of any doubts, the test should be repeated on a new sample of blocks to ensure that the results are accurate and consistent.

vii). Record keeping

The results of the dimensional accuracy inspection should be recorded and maintained for future reference. This will help in tracking the quality of the blocks over time and identifying any trends or issues.

Dimensional accuracy inspection is an essential part of quality control for AAC blocks. It is crucial to ensure that the blocks meet the required dimensional accuracy specifications to ensure their suitability for constructions where precise measurements are necessary. Any block with low dimensional accuracy should be rejected, while blocks with high dimensional accuracy can be used with confidence.

Accurate and consistent testing, record-keeping, and attention to detail are crucial for successful dimensional accuracy inspection of AAC blocks.

10). Durability 

Durability is an important property of AAC blocks, making them suitable for use in constructions where longevity is a concern. It is crucial to check the durability of AAC blocks during quality control to ensure that the blocks meet the required specifications for their intended use.

In this section, we will discuss the detailed process of durability inspection of AAC blocks.

i). Sampling

The first step in durability inspection is sampling. Samples should be randomly selected from the batch of AAC blocks to ensure that the testing is representative of the entire batch.

ii). Accelerated weathering test

The durability of AAC blocks can be measured using an accelerated weathering test. The testing apparatus consists of a UV chamber, a spray nozzle, and a temperature-measuring device.

iii). Testing procedure

The test specimens should be placed in the UV chamber, and the temperature should be raised to 50°C. The specimens should be exposed to UV light for a period of 1000 hours. At the end of the exposure period, the specimens should be sprayed with water for a period of 2 hours, and the temperature measuring device should be used to measure the temperature of the specimens.

iv). Comparison with standards

The durability of AAC blocks should be such that they can withstand exposure to UV light and water for a prolonged period without any significant deterioration. The measured durability of the block should be compared with the required standards to determine if it meets the required specifications.

v). Identification of blocks with low durability

If the measured durability of the block is lower than the required standard, it indicates that the block may not have the desired longevity properties. Blocks with low durability should be rejected and not used in constructions where longevity is a concern.

vi). Repeat the test

In case of any doubts, the test should be repeated on a new sample of blocks to ensure that the results are accurate and consistent.

vii). Record keeping

The results of the durability inspection should be recorded and maintained for future reference. This will help in tracking the quality of the blocks over time and identifying any trends or issues.

Durability inspection is an essential part of quality control for AAC blocks. It is crucial to ensure that the blocks meet the required durability specifications to ensure their suitability for constructions where longevity is a concern. Any block with low durability should be rejected, while blocks with high durability can be used with confidence.

Accurate and consistent testing, record-keeping, and attention to detail are crucial for the successful durability inspection of AAC blocks.

Thank you for taking the time to read this educational blog post about the AAC Blocks Quality Checklist. We hope that you found it informative and engaging. If you have any questions or comments, please feel free to leave comments in the comment section below. Don’t forget to check out our other educational posts on  myengineeringsupport.com for more learning opportunities!

Bar Bending Schedule (BBS) Basics Part -1

 This Ebook is specially designed for Freshers Civil Engineers. Recommended for Quantity Surveyors & Billing Engineers. Here You Can Learn All Basic Concepts & Formulas for Bar Bending schedules (BBS).

I hope this information can be useful for you guys.

If you like this article then please share it with your friends & also like our Facebook Page and join our Telegram Channel.

If you want a PDF copy of this, Do let’s know by commenting & you can message us on our Instagram & telegram channel,  or you can download it from the top right-hand corner of this post.

  AAC Blocks Manufacturing Process 
AAC Blocks Manufacturing Process 

Thanks For the Great Attention!

Good Bye & Take Care

Happy Learning 

Also, Read,

AAC Blocks Manufacturing Process – An Ultimate Guide

28 Important Comparison between WPC and PVC Wall Panel

MDF VS Particle Board – 15 Important Differences

Flush Door vs Wooden Panel Door 

Duco Paint VS PU Paint 

UPVC vs Aluminium vs Wooden Windows

 Related Video